Documentations
Rates Management
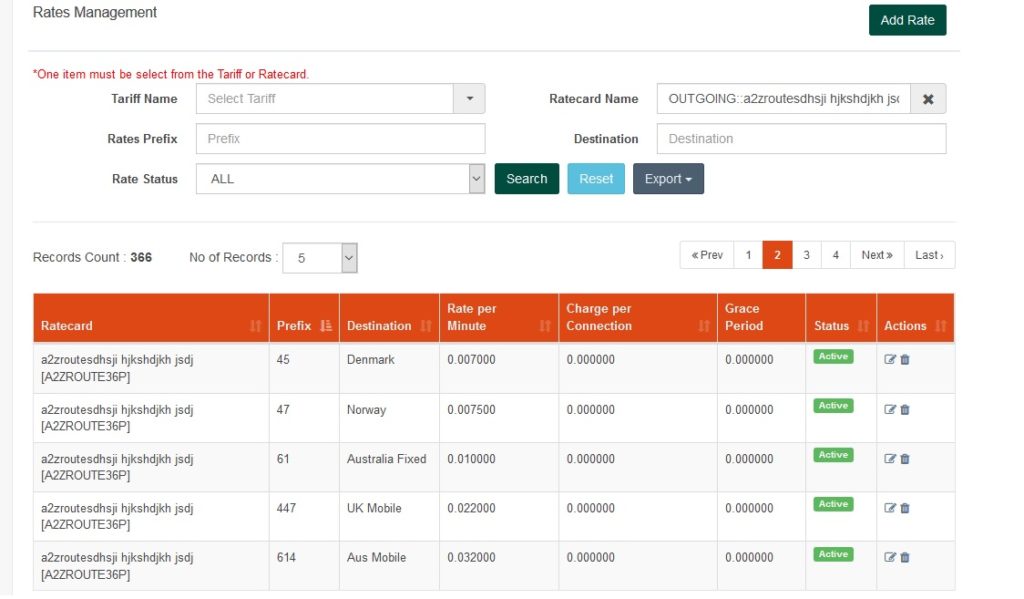
Rates are defines for Ratecard in the system based on destination and destination prefix for Customer and Carrier both.Configuration and management is simple and define in the system under the “Rate Management” –> “Rate” menu. There we can add, edit and delete the rates. System has option to add rates in a predefined Ratecard based on destination and destination prefix.
Rate Listing
For Rate listing, Search can be done by four ways :-
1.Tariff name
2.Ratecard Name
3.Rate Prefix
4.Destination
5.Status
Rate Listing provides two Action for User.
- Edit Rate
- Delete Rate
Rate Add
Add Rate Button is to add new Rates for Ratecard in the system. Following fields are available to add :
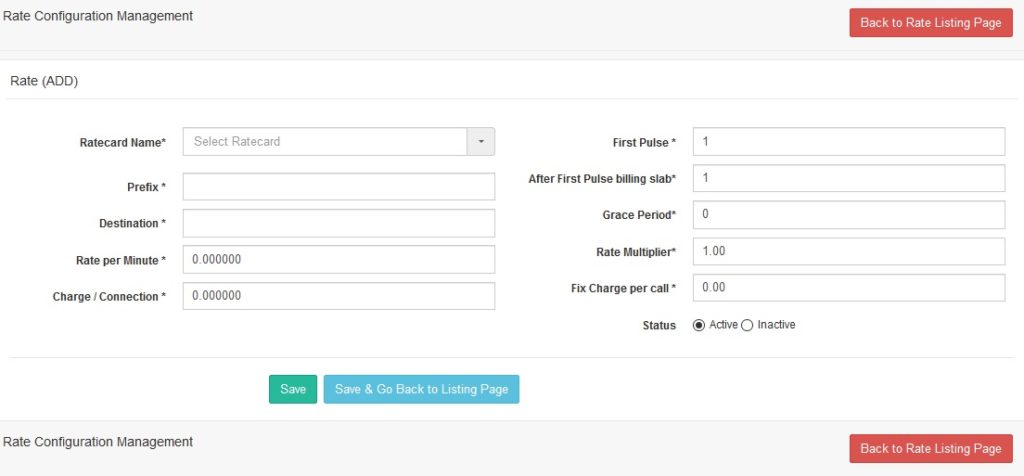
Ratecard Name | This defines Ratecard selection from dropdown for which system going to add new Rate | It support alphanumeric string and it’s mandatory. |
Prefix | Destination Prefix of new rate define here | It supports character value and it’s mandatory. |
Destination | Define destination for which rates are adding | It supports character value and it’s mandatory. |
Rate per Minute | Define rates per minute | It supports integer value and it’s mandatory. |
Charge/Connection | This defines connection charge for the RateCard | It supports integer value and it’s mandatory. |
First Pulse | This defines the minimum time duration after that billing starts | It supports integer value and it’s mandatory. |
After First Pulse Billing Slab | This defines billing slab applicable after first pulse. | It supports integer value and it’s mandatory. |
Grace Period | This defines free fix call time duration for which no charges applicable. | It supports integer value and it’s mandatory. |
Rate Multiplier | This defines Rates are fix or increases accordingly as set in rate multiplier. | It supports integer value and it’s mandatory. |
Fix Charge Per Call | This defines any applicable fix charge per call. | It supports integer value and it’s mandatory. |
Status | This defines Status of the Rate having selection “Active” or “Inactive” | It Supports Binary “0” or “1”. |
Rate Edit
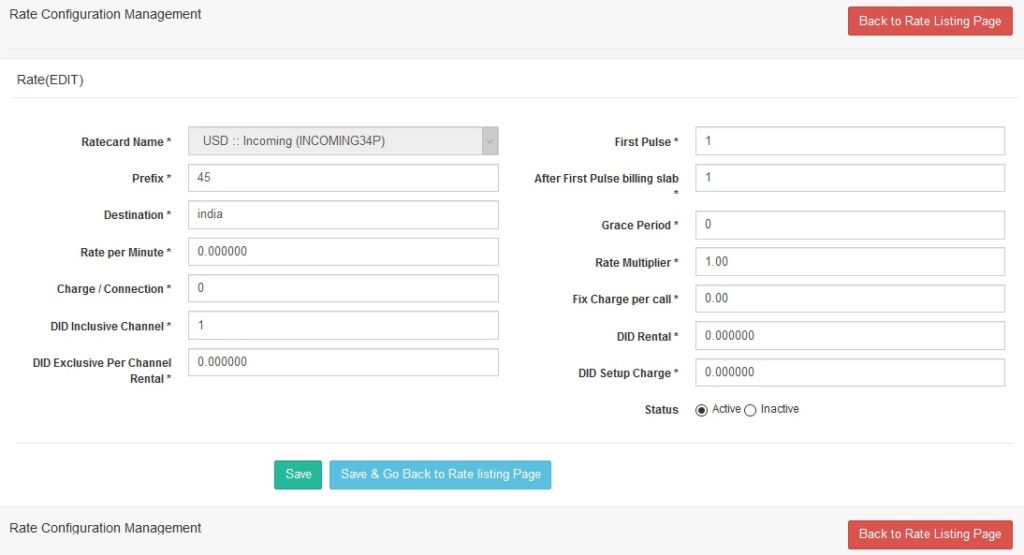
This option is available to Edit already existing Rates or updating Rates just Added.
RateCard Management
RateCard
Ratecard is the group of rates which is defines in the system based on destination and destination prefix.
System offers multiple type of rate cards such as carrier rates customer rates, carrier DID rates, customer DID rates, carrier PSTN and customer PSTN calling rates.
Configuration and management is simple and define in the system under the “Rates Management” –>“Ratecard” menu.
There we can add, edit and import the rates. System have option to provide the rate import from the existing rates with the customize bulk changes and import from the file.
RateCard Listing
Ratecard listing Search is based on Ratecard name , Ratecard Code, Currency ,Who can use & for.
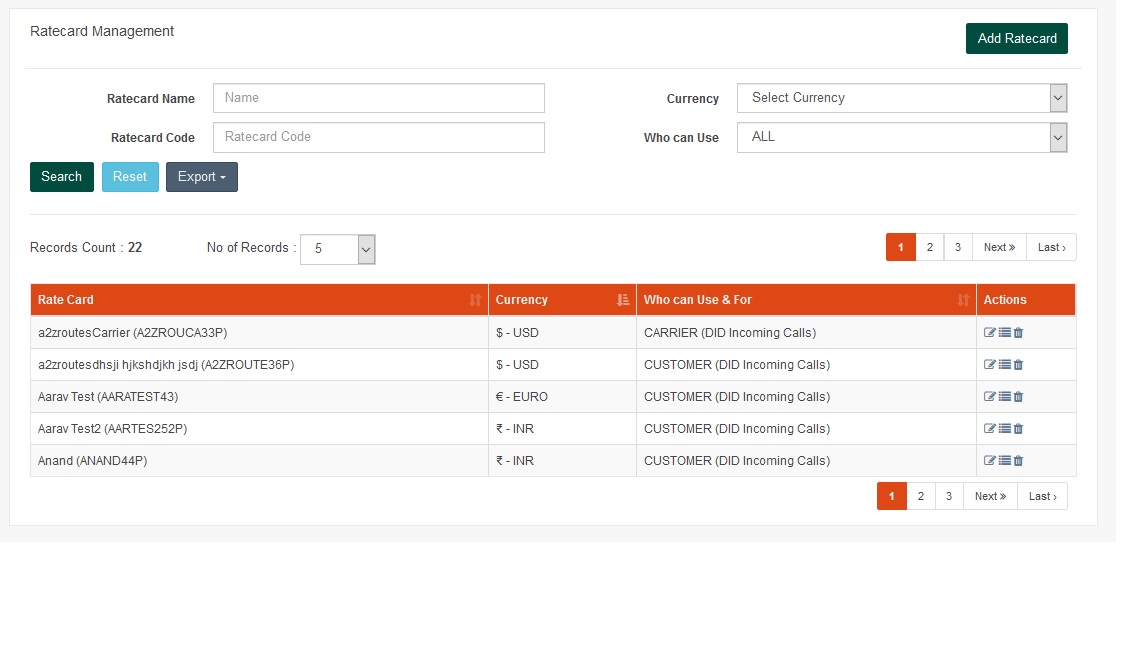
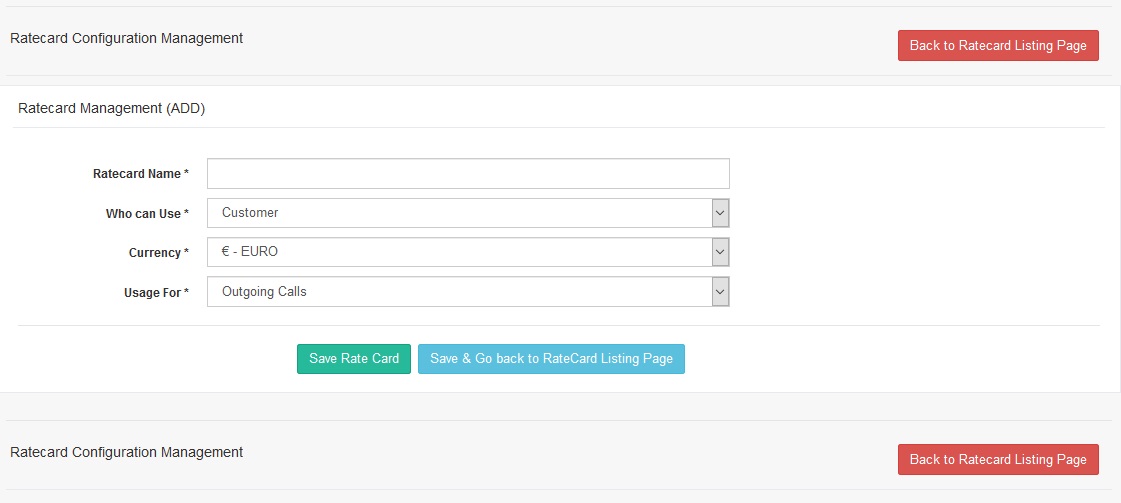
Ratecard Name | This is name of rate card which want to create. | It support alphanumeric string and it is mandatory. |
Who can use | This is dropdown and provides 2 options “Customer” and “Carrier”. Customer means only customer and reseller can use this rate cards and Carrier means Only Carrier can use. | This is supporting 2 values only such as “CUSTOMER” and “CARRIER” |
Currency | This is a dropdown which having different options for currency selection. | It supports integer value only. |
Usage for | This is a dropdown and provides two options “DID incoming calls” and “Outgoing calls” | It supports 2 values “DID incoming calls” and “Outgoing calls” |
Ratecard Usage Case
Case1
Want to rating for all outgoing calls which are originated by system customer based on destination and prefix then system provides to add the ratecard for these usages and add the Rates & Charges for A2Z destinations.
Case2
Want rates for all DID incoming calls comes in a system.
RateCard Edit
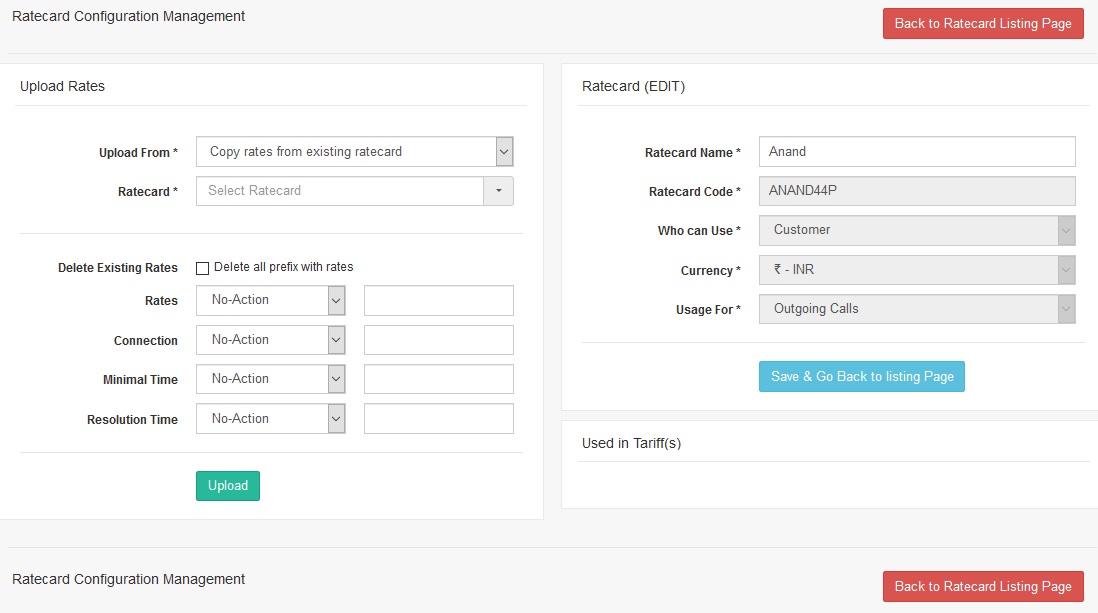
This option is available to Edit already existing Ratecard or updating Ratecard just Added.
System has an option to provide the rate import from the existing rates with the customize bulk changes and import from the file.
Installation
Installation of OV500-1.0.1 is required basic knowledge of kamailio, Freeswitch and Linux in order to do installation. Here, we are recommending installing solution on distributed environment to achieve the high performance and high calls volume. Below architecture should need to follow in solution deployment.
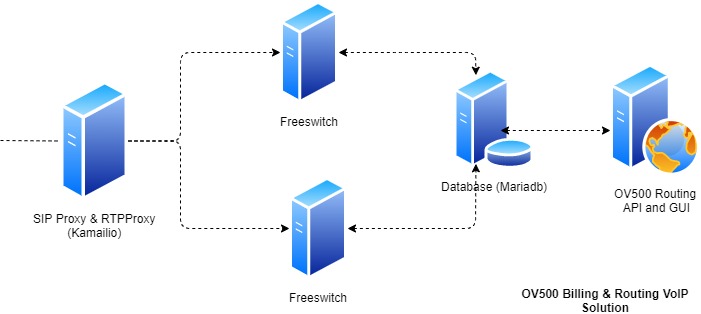
Its depend on your hardware availability; System is compatible to install all components on single machine but Kamailio and freeswitch should need to run on individual IP address.
OV500 Installation in CentOS 7 instruction are as
Install base packages
yum groupinstall "Development tools" -y #Enable epel and freeswitch repositoryyum install -y https://files.freeswitch.org/repo/yum/centos-release/ freeswitch-release-repo-0-1. noarch.rpm epel-release
yum update -y
yum install -y wget curl git bind-utils ntpdate systemd net-tools whois sendmail sendmail-cf mlocate iptables-devel net-snmp-devel iptables*
Now, disable the firewall and enable the iptables package
systemctl stop firewalld
systemctl disable firewalld
systemctl enable iptables
systemctl start iptables
Install the repository of PHP7 and packages
yum -y install http://rpms.remirepo.net/enterprise/remi-release-7.rpm
yum -y install epel-release yum-utils
yum-config-manager --disable remi-php54
yum-config-manager --enable remi-php73
yum install -y php php-fpm php-mysql php-cli php-json php-readline php-xml php-curl php-gd php-json php-mbstring php-mysql php-opcache php-pdo
Install the Freeswitch and kamailio dependencies
yum install -y kernel-devel kernel-headers libunistring-devel flex gcc hiredis-* libevent* *pcap* json-glib glib* glib2 glib2-devel xmlrpc-c-devel gcc-c++ alsa-lib-devel autoconf automake bison broadvoice-devel bzip2 curl-devel libdb4-devel e2fsprogs-devel erlang flite-devel g722_1-devel gdbm-devel gnutls-devel ilbc2-devel ldns-devel libcodec2-devel libcurl-devel libedit-devel libidn-devel libjpeg-devel libmemcached-devel libogg-devel libsilk-devel libsndfile-devel libtheora-devel libtool libvorbis-devel libxml2-devel lzo-devel mongo-c-driver-devel ncurses ncurses-devel openssl-devel opus-devel pcre-devel perl perl-ExtUtils-Embed pkgconfig portaudio-devel python-devel soundtouch-devel speex-devel sqlite sqlite-devel unbound-devel unixODBC unixODBC-devel libuuid-devel which zlib-devel ImageMagick ImageMagick-devel iftop htop tcpdump ngrep psmisc readline* lua lua-devel postgresql-devel yasm nor nasm
yum install -y luarocks && luarocks install lua-cjson
yum install python-devel json-devel json-c-devel
yum update -y
Database Installation
OV500 recommend to use the mariadb-10.x for high performance in the individuel server otherwise use the mariadb-5.x. mariadb-10.x installation steps are
#Add the mariadb repository in the system
vi /etc/yum.repos.d/MariaDB.repo
Now add the following lines in repo
[mariadb]
name = MariaDB
baseurl = http://yum.mariadb.org/10.1/centos7-amd64
gpgkey=https://yum.mariadb.org/RPM-GPG-KEY-MariaDB
gpgcheck=1
Install the mariadb-10-x using yum
yum -y install MariaDB-server MariaDB-client unixODBC mariadb-devel
Mariadb-5.x version installation on centos-7
yum install mariadb mariadb-devel mariadb-server
Start the mariadb service
systemctl start mariadb
systemctl enable mariadb
systemctl status mariadb
Disable the selinux
sed -i "s#SELINUX=enforcing#SELINUX=disabled#g" /etc/selinux/config
sed -i "s#SELINUX=permissive#SELINUX=disabled#g" /etc/selinux/config
setenforce 0
Install SIP Proxy and Media Servers
Install Freeswitch, Kamailio and RTP Proxy packages
#Install the Kamailio & RTPProxy
yum -y install rtpproxy  jansson* python python-devel
cd /usr/local/src/
rm -rf /usr/local/src/kamailio
wget https://www.kamailio.org/pub/kamailio/4.4.6/src/kamailio-4.4.6_src.tar.gz
tar -xf kamailio-4.4.6_src.tar.gz
mv kamailio-4.4.6 kamailio
cd /usr/local/src/kamailio
make include_modules="db_mysql dialplan dispatcher exec" exclude_modules="python acc_radius app_java app_lua app_mono app_perl app_python auth_ephemeral auth_identity auth_radius carrierroute cdp cdp_avp cnxcc cpl-c crypto db2_ldap db_berkeley db_cassandra db_mongodb db_oracle db_perlvdb db_postgres db_sqlite db_unixodbc dialplan dnssec erlang evapi geoip geoip2 gzcompress h350 http_async_client ims_auth ims_charging ims_dialog ims_icscf ims_isc ims_qos ims_registrar_pcscf ims_registrar_scscf ims_usrloc_pcscf ims_usrloc_scscf iptrtpproxy jansson janssonrpc-c json jsonrpc-c kazoo lcr ldap log_systemd memcached mi_xmlrpc misc_radius ndb_cassandra ndb_mongodb ndb_redis osp outbound peering purple regex rls sctp snmpstats xhttp_pi xmlops xmlrpc xmpp" cfg prefix="/home/OV500/LB"
make install
cd /usr/local/src
git clone https://github.com/signalwire/freeswitch.git
cd /usr/local/src/freeswitch
./bootstrap.sh -j
./configure --prefix=/home/OV500
rm -rf /usr/local/src/freeswitch/modules.conf
echo 'applications/mod_callcenter
applications/mod_commands
applications/mod_conference
applications/mod_curl
applications/mod_db
applications/mod_dptools
applications/mod_enum
applications/mod_esf
applications/mod_esl
applications/mod_expr
applications/mod_fifo
applications/mod_fsv
applications/mod_hash
applications/mod_httapi
applications/mod_sms
applications/mod_spandsp
applications/mod_valet_parking
applications/mod_voicemail
codecs/mod_amr
codecs/mod_b64
codecs/mod_g723_1
codecs/mod_g729
codecs/mod_h26x
dialplans/mod_dialplan_asterisk
dialplans/mod_dialplan_xml
endpoints/mod_loopback
endpoints/mod_rtc
endpoints/mod_skinny
endpoints/mod_sofia
endpoints/mod_verto
event_handlers/mod_cdr_csv
event_handlers/mod_cdr_sqlite
event_handlers/mod_event_socket
formats/mod_local_stream
formats/mod_native_file
formats/mod_png
formats/mod_sndfile
formats/mod_tone_stream
languages/mod_lua
loggers/mod_console
loggers/mod_logfile
loggers/mod_syslog
say/mod_say_en
xml_int/mod_xml_cdr
xml_int/mod_xml_curl
xml_int/mod_xml_rpc
xml_int/mod_xml_scgi
#../../libs/freetdm/mod_freetdm
#../../contrib/mod/xml_int/mod_xml_odbc'>>/usr/local/src/freeswitch/modules.conf
make
make install
make cd-sounds-install
make cd-moh-install
Install the OV500 Database and Application
yum install -y nginx libxml2 libxml2-devel openssl openssl-devel gettext-devel fileutils
setenforce 0
systemctl start nginx
systemctl enable nginx
systemctl start php-fpm
systemctl enable php-fpm
mkdir -p /etc/nginx/ssl
#Below CMD is to set up the self sign ssl certificate
openssl req -x509 -nodes -days 365 -newkey rsa:2048 -keyout /etc/nginx/ssl/nginx.key -out /etc/nginx/ssl/nginx.crt
cd /usr/local/src/
git clone  --branch 1.0.1 https://github.com/openvoips/OV500.git
#Copy the pre-configured config file from OV500 Source folder
cp /usr/local/src/OV500/config/nginx/ov500.conf /etc/nginx/conf.d/ov500.conf
sed -i "s/;request_terminate_timeout = 0/request_terminate_timeout = 300/" /etc/php-fpm.d/www.conf
sed -i "s#short_open_tag = Off#short_open_tag = On#g" /etc/php.ini
sed -i "s#;cgi.fix_pathinfo=1#cgi.fix_pathinfo=1#g" /etc/php.ini
sed -i "s/max_execution_time = 30/max_execution_time = 3000/" /etc/php.ini
sed -i "s/upload_max_filesize = 2M/upload_max_filesize = 20M/" /etc/php.ini
sed -i "s/post_max_size = 8M/post_max_size = 20M/" /etc/php.ini
sed -i "s/memory_limit = 128M/memory_limit = 512M/" /etc/php.ini
systemctl restart php-fpm
rm -rf /usr/local/src/OV500/portal/application/config/database.php
echo "<?php
defined('BASEPATH') OR exit('No direct script access allowed');
\$active_group = 'default';
\$query_builder = TRUE;
\$db['default'] = array(
'dsn' => 'mysql:host=localhost;dbname=switch',
'hostname' => '',
'username' => 'ovswitch',
'password' => 'ovswitch123',
'database' => '',
'dbdriver' => 'pdo',
'dbprefix' => '',
'pconnect' => TRUE,
'db_debug' => TRUE,
'cache_on' => FALSE,
'cachedir' => '',
'char_set' => 'utf8',
'dbcollat' => 'utf8_general_ci',
'swap_pre' => '',
'encrypt' => FALSE,
'compress' => FALSE,
'stricton' => FALSE,
'failover' => array()
);
\$db['cdrdb'] = array(
'dsn' => 'mysql:host=localhost;dbname=switchcdr',
'hostname' => '',
'username' => 'ovswitch',
'password' => 'ovswitch123',
'database' => '',
'dbdriver' => 'pdo',
'dbprefix' => '',
'pconnect' => FALSE,
'db_debug' => FALSE,
'cache_on' => FALSE,
'cachedir' => '',
'char_set' => 'utf8',
'dbcollat' => 'utf8_general_ci',
'swap_pre' => '',
'encrypt' => FALSE,
'compress' => FALSE,
'stricton' => FALSE,
'failover' => array(),
'save_queries' => TRUE
);">>/usr/local/src/OV500/portal/application/config/database.php
rm -rf /usr/local/src/OV500/portal/api/config.php
echo "error_reporting(0);
ini_set('memory_limit', '1024M');
date_default_timezone_set('Asia/Kolkata');
define('CDR_DSN', 'mysql:dbname=switchcdr;host=localhost');
define('CDR_DSN_LOGIN', 'ovswitch');
define('CDR_DSN_PASSWORD','ovswitch123');
define('SWITCH_DSN', 'mysql:dbname=switch;host=localhost');
define('SWITCH_DSN_LOGIN', 'ovswitch', );
define('SWITCH_DSN_PASSWORD','ovswitch123');
define('LOGPATH', 'log/');
define('LOGWRITE', '0');
define('DBLOGWRITE', '1');">/usr/local/src/OV500/portal/api/config.php
cp -rf /usr/local/src/OV500/portal /home/OV500/
ln -s /home/OV500/portal /var/www/html/portal
chown -Rf apache.apache /var/www/html/portal
chown -Rf apache.apache /home/OV500/portal
Switch & Billing Database Schema Installation
Use below command to create the databases for OV500 Switch
mysqladmin create switch
mysqladmin create switchcdr
mysqladmin create kamailio
Create the ovswitch database user
mysql -e "GRANT ALL PRIVILEGES ON *.* TO 'ovswitch'@'localhost' IDENTIFIED BY 'ovswitch123'";
mysql  switch < /usr/local/src/OV500/config/database/switch.sql
mysql  switchcdr < /usr/local/src/OV500/config/database/switchcdr.sql
mysql  kamailio < /usr/local/src/OV500/config/database/kamailio.sql
Kamailio Configuration
kamailio is installed in /home/OV500/LB folder and there are kamailio.cfg and dispatcher.list files exist. Now, need to configure the kamailio server IP address and database access in kamailio.cfg and freeswitch server IP-Address in dispatcher.list.
rm -rf /home/OV500/LB/etc/kamailio
cp -rf /usr/local/src/OV500/config/kamailio /home/OV500/LB/etc/
vi /home/OV500/LB/etc/kamailio/kamailio.cfg
#find the “OV500_LB_IP” text in cfg file and replace with kamailio server IP address.
#Below is one example
#!substdef "!MY_IP_ADDR!OV500_LB_IP!g"
if kamailio server IP-Address id 192.168.1.20 then after changing the IP; above configuration will be such like as
#!substdef "!MY_IP_ADDR!192.168.1.20!g"
Next to configure the DB access; below is strings in with need to provide the database connection string
#!define DBSIPLOG "DBACCESS_KAMAILIO"
#!define DBKAMAILIO "DBACCESS_KAMAILIO"
#!define DBSWITCH "DBACCESS_SWITCH"
#!define HASHDB "DBACCESS_SWITCH"
#!define DBCA "ca=>SQLCONCA"
#!define DBCDRCA "cdrca=>SQLCONCDRCA"
“DBACCESS_KAMAILIO” text is used to connect the kamailio database and it need to replace as “mysql://ovswitch:ovswitch123@localhost/kamailio”
“DBACCESS_SWITCH” text in cfg need to replace by “mysql://ovswitch:ovswitch123@localhost/switch” for switch database connection
“SQLCONCA” text in cfg need to replace by “mysql://ovswitch:ovswitch123@localhost/switch”
“DBCDRCA” text in cfg need to replace by “mysql://ovswitch:ovswitch123@localhost/switchcdr”
Now, configure the freeswitch IP in the kamailio dispatcher.list
vi /home/OV500/LB/etc/kamailio/dispatcher.list
#below is sample configuration of dispatcher.list
# $Id$
# dispatcher destination sets
# setit(int) destination(sip uri) flags(int,opt) priority(int,opt) attributes(str,opt)
# Freeswitch IPS
2 sip:192.168.1.25:5060
#Allw incoming calls from Freeswitch IP
4 sip:192.168.1.25:5060
#List of carrier DID provider
5 sip:10.10.10.10
Here, 192.168.1.25 IP is freeswitch IP and it need to replace by the freeswitch server IP-address.
Note: if any DID provides DID calls want to accept with IP authentication as carrier provider then add the DID provider IP address in carrier DID provider list in dispatcher.list
Freeswitch Configuration
cd /usr/local/src/OV500/config/freeswitch
sed -i 's/LBSERVERIP/'192.168.1.20'/g'
/usr/local/src/OV500/config/freeswitch/autoload_configs/acl.conf.xml
sed -i 's/OV500FSIPADDRESS/'192.168.1.25'/g' /usr/local/src/OV500/config/freeswitch/vars.xml
cp -rf autoload_configs/acl.conf.xml /home/OV500/etc/freeswitch/autoload_configs/acl.conf.xml
cp -rf autoload_configs/lua.conf.xml /home/OV500/etc/freeswitch/autoload_configs/lua.conf.xml
cp -rf autoload_configs/modules.conf.xml /home/OV500/etc/freeswitch/autoload_configs/modules.conf.xml
cp -rf autoload_configs/switch.conf.xml /home/OV500/etc/freeswitch/autoload_configs/switch.conf.xml
cp -rf autoload_configs/xml_cdr.conf.xml /home/OV500/etc/freeswitch/autoload_configs/xml_cdr.conf.xml
cp -rf autoload_configs/xml_curl.conf.xml /home/OV500/etc/freeswitch/autoload_configs/xml_curl.conf.xml
cp -rf vars.xml /home/OV500/etc/freeswitch/vars.xml
cp -rf sip_profiles/internal.xml /home/OV500/etc/freeswitch/sip_profiles/internal.xml
Here, 192.168.1.25 IP is freeswitch IP in example and 192.168.1.20 is kamailio IP to allow the incoming traffic in freeswitch using ACL module.
Configure the lua script for voicemail users
Copy the vm_user.lua in freeswitch script folder from the api lib folder
cp /usr/local/src/OV500/portal/api/lib/vm_user.lua /home/OV500/share/freeswitch/scripts/
local dbh = freeswitch.Dbh("odbc://freeswitch:ovswitch:ovswitch123")[freeswitch]
Driver = MySQL
SERVER = localhost
PORT = 3306
DATABASE = switch
OPTION = 67108864
USER = ovswitch
PASSWORD = ovswitch123
rtpproxy -l SERVERIP -s udp:localhost:5899 -u rtpproxy rtpproxy
#Start the Freeswitch service
/home/OV500/bin/freeswitch -nc
#Start the IP Tables
systemctl start iptables
systemctl enable iptables
#Start the Kamailio service
/home/OV500/LB/sbin/kamailio
Introduction
“OV500 Switch” project is an open source VoIP Billing Software fill for Retail, Wholesale business. The software provides Admin Module, Reseller Module, and Customer Module in addition including SIP Authentication, Caller ID authentication, IP authentication, Real-time Billing features and many more.

- Wholesale Solution
- Carrier Grade Billing Solution
- Class4 Switch and Billing
- PC2Phone Solution – OV500 is fit for PC2Phone calling solution. PSTN calls can be made by Using SIP Phone Device using OV500 Solution.
- VoIP residential services – OV500 Switch is completely designed for:
- Residential service to provide the Number using DID( SIP-based PSTN Number)
- Route calls on SIP Phone Device similarly from SIP Phone device to PSTN number.
- DID Solution – DID can be redirected to any SIP Phone Device or PSTN network using OV500 solution.
Above all , here are basic component used in the “OV500 Switch & Billing Solution”
- The solution is compatible to run in Linux platform.
- DID (VoIP Numbers) compatibility for Residential number and Calling card.
- Used Nginx Open Source web server.
- Used MariaDB as Open Source Database.
- Kamailio, FreeSwitch & RTPProxy as SIP Switch.


