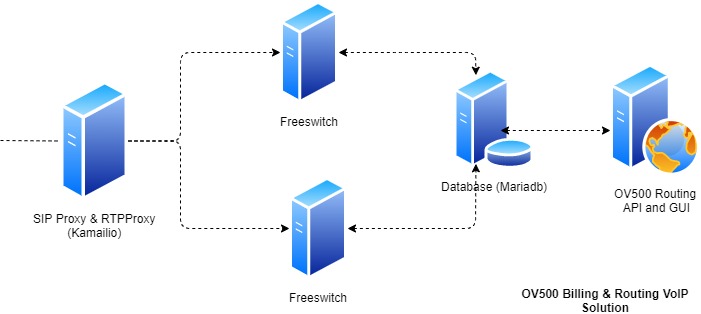
OV360 Solution is upcoming solution which will offer Voice Solution ( Call center and PBX Solution ), Email, Support Chat, Voice & Video Call calling system under one umbrella. We can say OV360 will be Omni channels solution.
How to install Homer SIPCapture Server with Kamailio in CentOS 7
Introduction
HOMER is a robust, carrier-grade, scalable SIP Capture system and VoiP Monitoring Application offering HEP/EEP, IP Proto4 (IPIP) encapsulation & port mirroring/monitoring support right out of the box, ready to process & store insane amounts of signaling, logs and statistics with instant search, end-to-end analysis and drill-down capabilities for ITSPs, VoIP Providers and Trunk Suppliers using SIP signaling protocol.
Reference: https://github.com/sipcapture/homer/
Methodology
Following is the step by step guide for installing Homer with Kamailio SIP Proxy.
Step # 1
First of install some of the dependencies of the Homer & Kamailio:
Installing dependencies with yum.
# Dependencies

$ sudo yum -y install epel-release

$ sudo yum update

$ sudo yum -y install httpd mariadb-server mariadb mysql mysql-devel php

 php-mysql php5-mysql wireshark bison pcre-devel libpcap-devel flex git
Step # 2
You can skip this step if you have already setup database and Apache Server.
Start Mariadb and set root password for the databases:
$ systemctl start mariadb

$ mysql_secure_installation
Edit Apache Configurations file:
$ sudo vi /etc/httpd/conf/httpd.conf
Update the http.conf file with following contents:
...

<directory html="" var="" www="">
   Options Indexes FollowSymLinks MultiViews

AllowOverride All

Order allow,deny

allow from all

</directory>

...
$ sudo systemctl start httpd.service

$ sudo systemctl enable httpd.service

$ sudo systemctl enable mariadb
In this step, we are going to download source of Homer API and UI and place the code at the appropriate locations.
# Homer

$ cd /usr/src/

$ sudo git clone https://github.com/sipcapture/homer-api.git

$ sudo git clone https://github.com/sipcapture/homer-ui.git
$ mkdir /opt/sipcapture
$ sudo cp -rf /usr/src/homer-ui/* /var/www/html/
$ sudo cp -rf /usr/src/homer-api/api/ /var/www/html/
$ sudo cp -rf /usr/src/homer-api/scripts/* /opt/sipcapture/
$ sudo chmod -R a+x /opt/sipcapture/
In this step, we are going to setup Homer Database user, password and tables.
Please make sure that you have changed following file with your desired credentials:
$ sudo vi /usr/src/homer-api/sql/homer_user.sql
Please change db-username and db-password parameters as below:
...

CREATE USER ''@'localhost' IDENTIFIED BY '';

GRANT ALL ON homer_configuration.* TO ''@'localhost';

GRANT ALL ON homer_statistic.* TO ''@'localhost';

GRANT ALL ON homer_data.* TO ''@'localhost';

...
Now save and close the file.
You can install Homer databases schema with following commands:
$ mysql -u root -p < /usr/src/homer-api/sql/homer_user.sql

$ mysql -u root -p homer_data < /usr/src/homer-api/sql/schema_data.sql

$ mysql -u root -p homer_configuration < /usr/src/homer-api/sql/schema_configuration.sql

$ mysql -u root -p homer_statistic < /usr/src/homer-api/sql/schema_statistic.sql
You can setup crontab to rotate sipcapture homer_data database tables after one day.
Change Database username and password in below file:
sudo vi /opt/sipcapture/rotation.ini
Please change db-username and db-password parameters as below:
...

[MYSQL]
user=

password=

host=localhost

port=3306

db_data = homer_data

db_stats = homer_statistic

# Extra param

newtables = 2 # Create new tables or partitions for next 2 days

engine = InnoDB #MyISAM or InnoDB

compress=ROW_FORMAT=COMPRESSED KEY_BLOCK_SIZE=8

...
Save and close the file.
$ sudo crontab -e -u root

...

30 3 * * * /opt/sipcapture/homer_rotate > /dev/null 2>&1

...
Save and close the file.
You have to manually run the rotate file as below:
$ sudo /opt/sipcapture/homer_rotate
Make sure that it has created tables with current date in homer_data database otherwise you have to rename the tables.
Step # 6
In this step, we are going to install Kamailio to capture SIP packets.
Download and Install Kamailio from source:
$ cd /usr/src/

$ sudo git clone --depth 1 https://github.com/kamailio/kamailio kamailio

$ cd kamailio

$ sudo make FLAVOUR=kamailio include_modules="db_mysql sipcapture pv textops rtimer xlog sqlops htable sl siputils" cfg

$ sudo make all

$ sudo make install
In order to configure Kamailio, following actions are required.
$ sudo cp /usr/src/homer-api/examples/sipcapture/sipcapture.kamailio /usr/local/etc/kamailio/kamailio.cfg

$ sudo vi /usr/local/etc/kamailio/kamailio.cfg
Edit kamailio.cfg with database credentials and your Server IP (replace X.X.X.X with your Server IP):
...

#!substdef "!HOMER_DB_USER!!g"

#!substdef "!HOMER_DB_PASSWORD!!g"

#!substdef "!HOMER_LISTEN_PROTO!udp!g"

#!substdef "!HOMER_LISTEN_IF!X.X.X.X!g"

#!substdef "!HOMER_LISTEN_PORT!9060!g"

#!substdef "!HOMER_STATS_SERVER!tcp:HOMER_LISTEN_IF:8888!g"

...
Save and close the file.
Starting Kamailio with following command;
$ sudo kamailio

Listening on

udp: X.X.X.X:9060

Aliases:

udp: sipcatpure.example.com:9060
In this step, we are going to make final configuration changes for Homer UI:
$ cd /var/www/html/api/

$ sudo cp /var/www/html/api/preferences_example.php /var/www/html/api/preferences.php

$ sudo cp /var/www/html/api/configuration_example.php /var/www/html/api/configuration.php

$ sudo chmod 777 /tmp
Determine the executable paths of tshark and egrep for writing in configuration.php.
$ which tshark

/usr/sbin/tshark
$ which egrep
/usr/bin/egrep
Edit the configuration file for Homer UI:
$ sudo vi /var/www/html/api/configuration.php
Change your database credentials and executable paths of tshark and egrep determined as above:
...

if(!defined('HOMER_CONFIGURATION')):

define('HOMER_CONFIGURATION', 1);

/*********************************************************************************/

/* AUTH DB homer. User and Configuration */

define('DB_HOSTNAME', "localhost");

define('DB_PORT', 3306);

define('DB_USERNAME', "");

define('DB_PASSWORD', "");

define('DB_CONFIGURATION', "homer_configuration");

define('DB_STATISTIC', "homer_statistic");

define('DB_HOMER', "homer_data");

define('SINGLE_NODE', 1);
/*********************************************************************************/
/* webHomer Settings
* Adjust to reflect your system preferences
*/
define('PCAPDIR', ROOT."/tmp/");
define('WEBPCAPLOC',"/tmp/");
/* Tshark settings for ISUP analyse */
define('TSHARK_ENABLED',1);
define('TSHARK_PATH','/usr/sbin/tshark');
define('EGREP','/usr/bin/egrep');
/* INCLUDE preferences */
include_once("preferences.php");
endif;
?>
...
Edit the preferences file needed for configurations.
sudo vi /var/www/html/api/preferences.php
Change X.X.X.X to your Server IP Address and email addresses:
...

define('ALARM_FROMEMAIL',"homer@example.com");

define('ALARM_TOEMAIL',"user01@example.com");

...

define('REMOTE_LOG_URL', "http://X.X.X.X:9200");

...

define('EXTERNAL_AUTH_URI', "http://X.X.X.X/api/request");

...
Step # 8
Now you have successfully installed Homer SIPCapture Server and you can login the server with following credentials and replace X.X.X.X with your server IP.
URL: http://X.X.X.X/
Username: admin
Password: test123


